Calendar
What’s covered?
In this guide, you’ll learn more about the account-level Calendar in the Social section of Moz Local and how to create new social calendars for your groups and locations.
Quick Links
Locating the Calendar in Moz Local
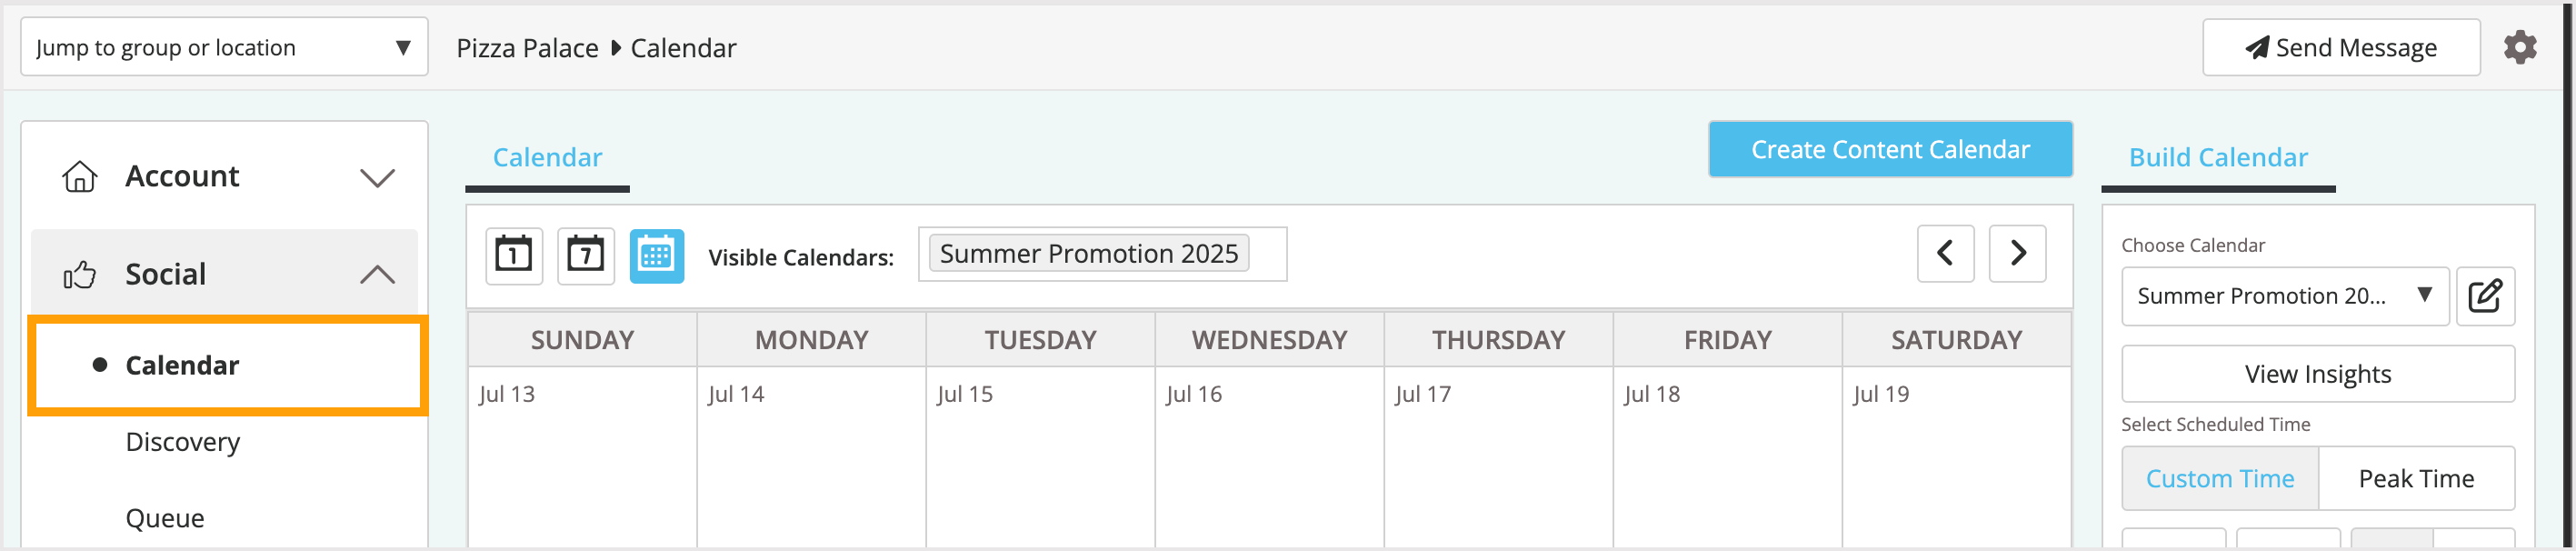
The Calendar view in Moz Local looks similar to the Scheduler view. The primary difference is that the Calendar allows you to create and suggest content calendars for one or more locations. This means you can create content for multiple locations at once to streamline your social posting.
You can access the Calendar from the Social section of the left-hand navigation menu while at the account level. If you are currently at the location or group level, you will only see the Scheduler option in this menu. You can use the drop-down on the top left to select the account-level view instead.
Benefits of using the social calendar in Moz Local
The Community Calendar allows Moz Local users to create and share a pre-planned schedule of posts and ads with locations. With just a few clicks, locations can publish these posts and ads on their social media pages.
How is the Calendar different from the Scheduler in Moz Local?
The calendar allows you to create content calendars for multiple locations/groups and share them, whereas the scheduler is location-specific and only shows content for the selected location.
Creating a new content calendar
In just a few steps, you can create a schedule of ads and posts and share them with locations through the Community Calendar.
To get started:
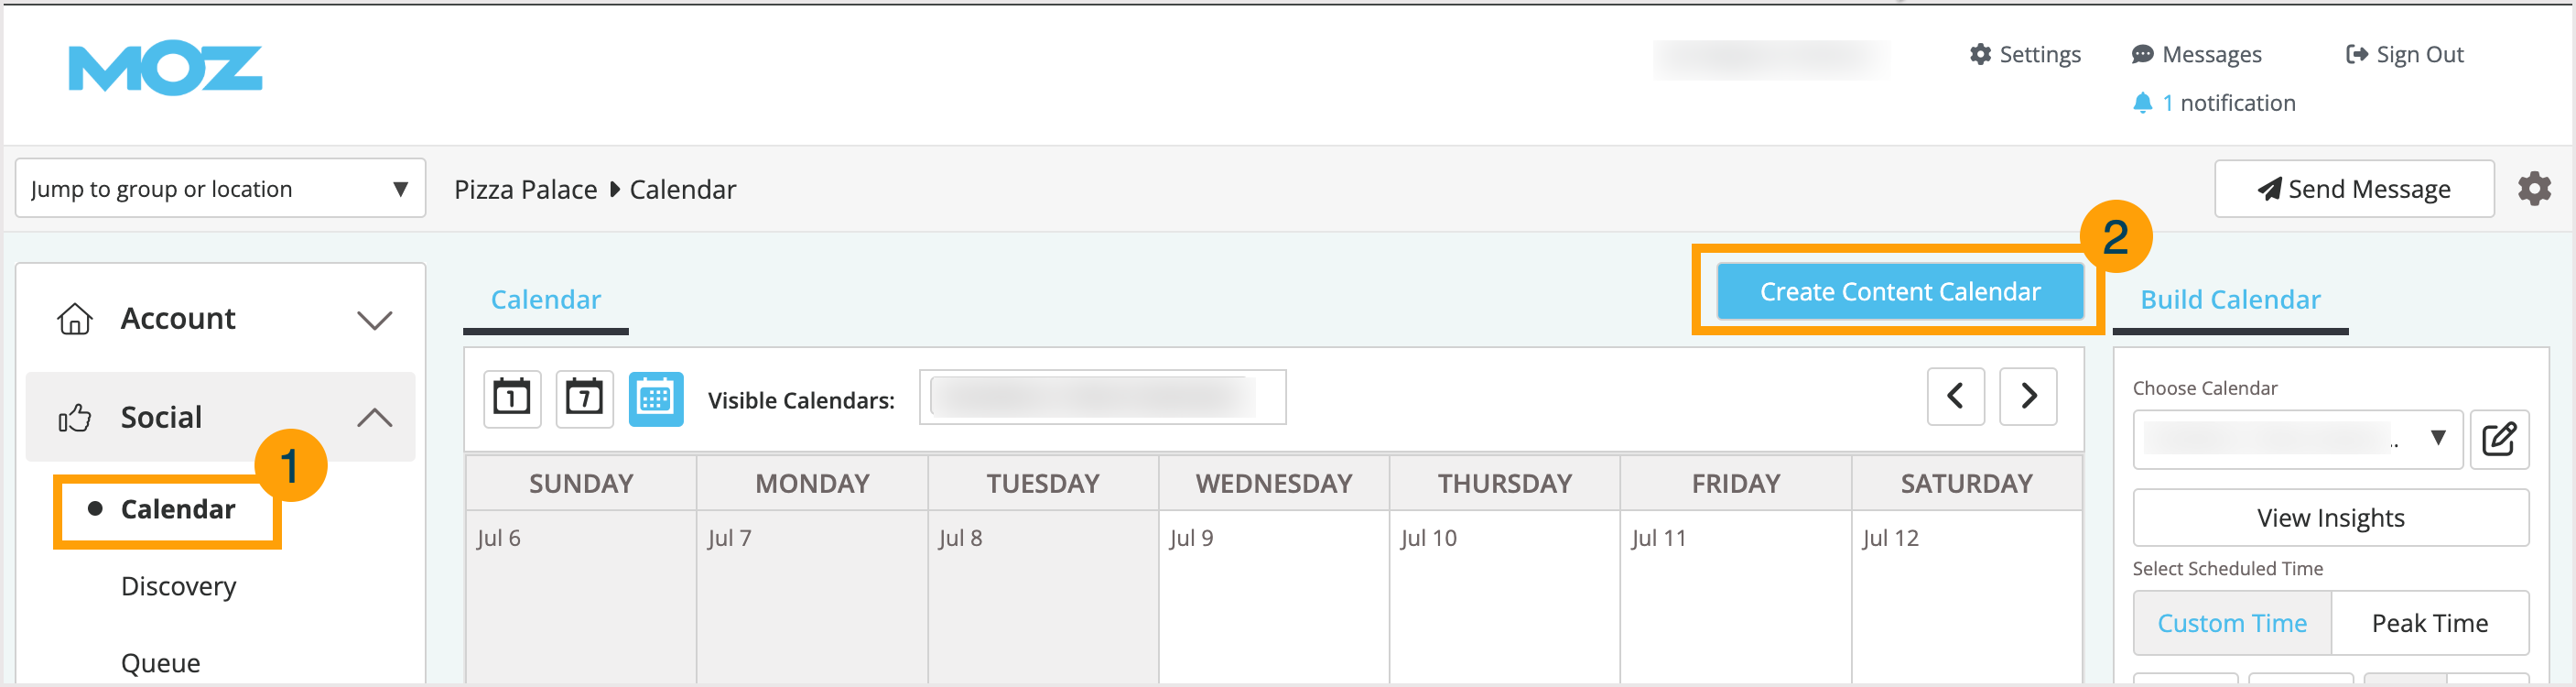
- At the Account level, navigate to the Social section of Moz Local and then click on Calendar
- Click Create Content Calendar on the top right
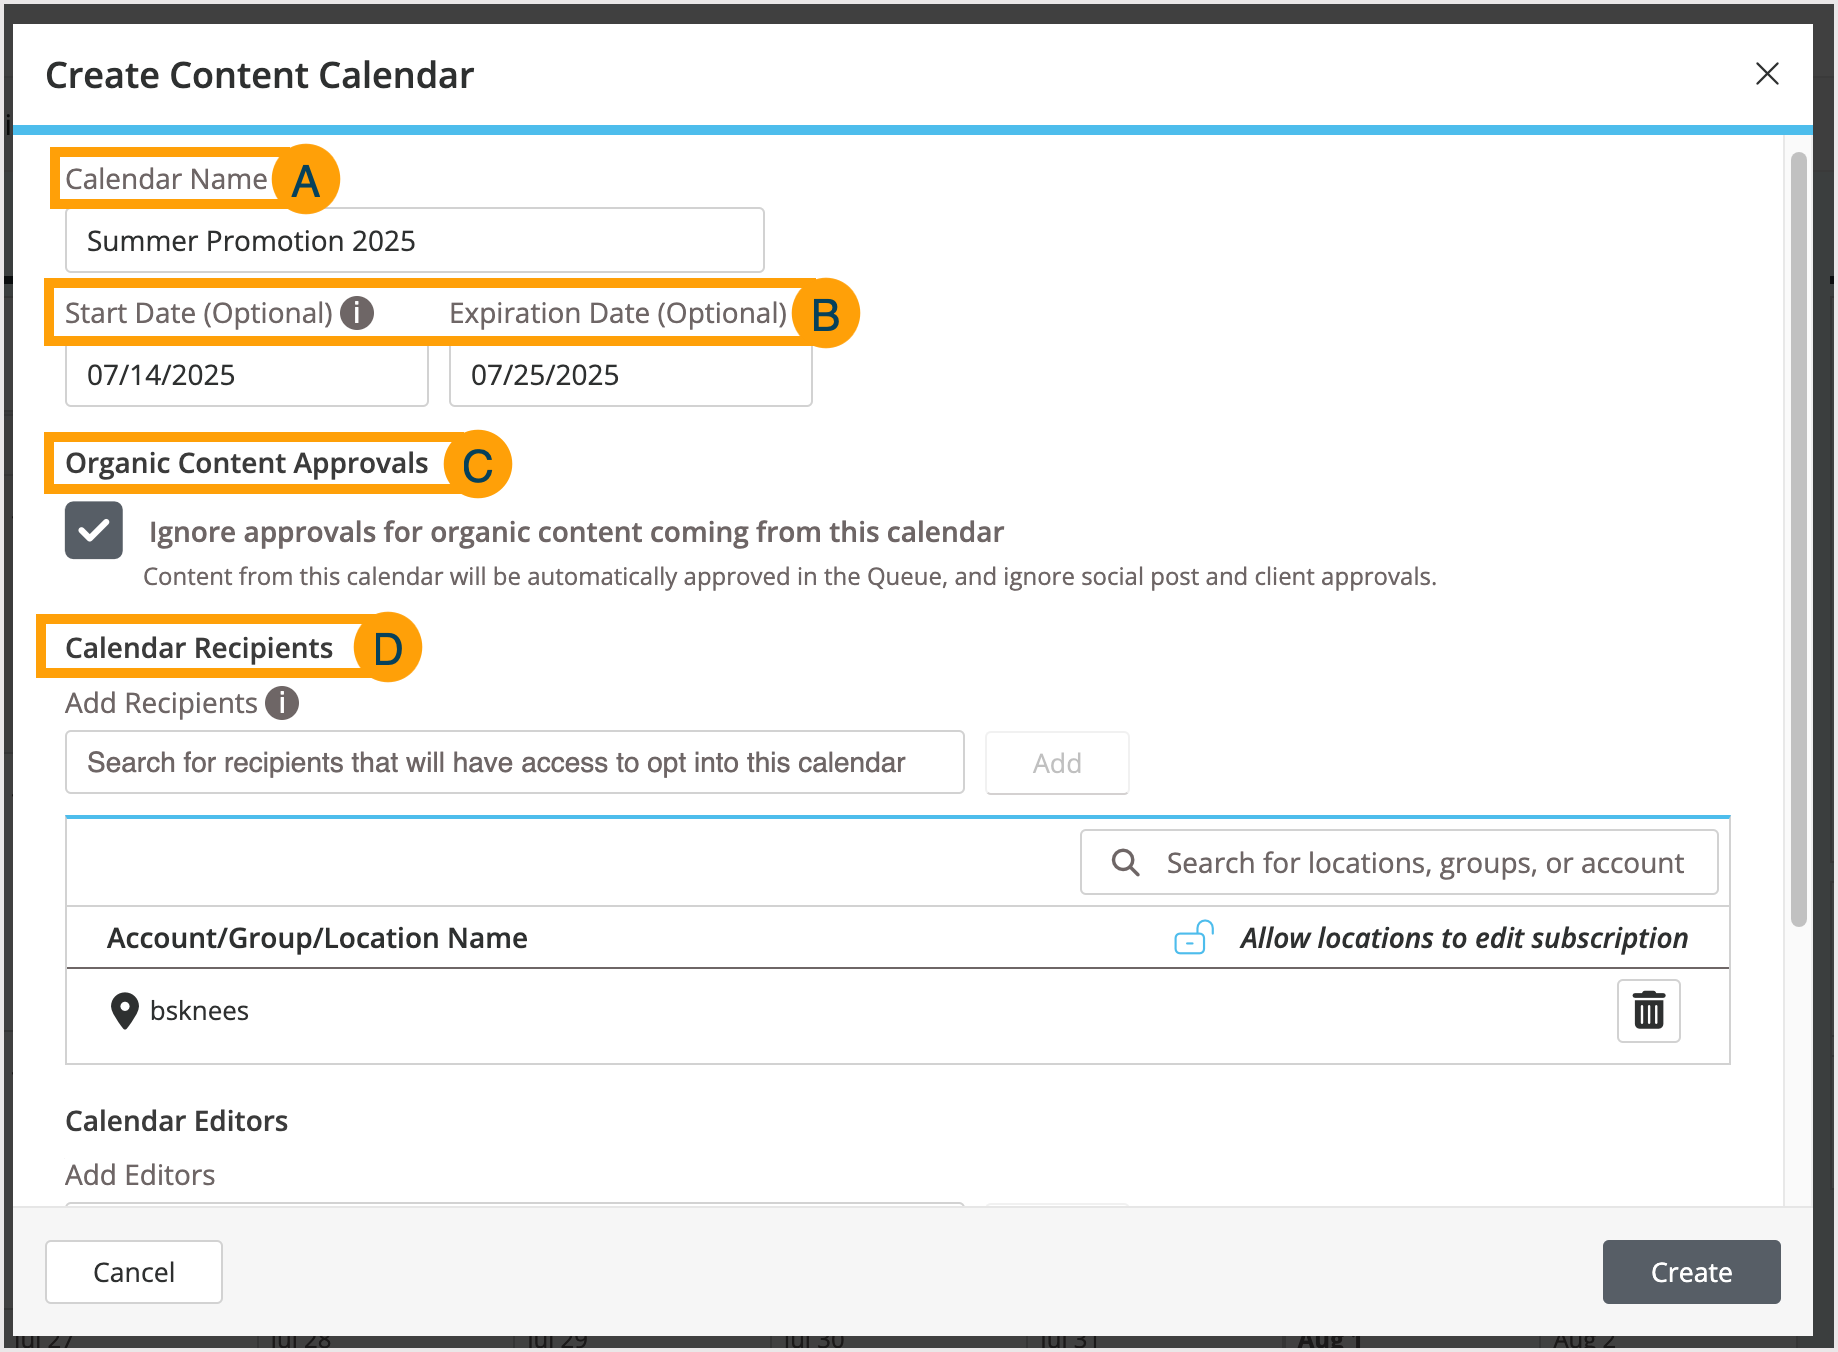
- In the Create Content Calendar pop-up, fill in the information below
- Calendar Name - Pick a name reflective of the content included so that those who receive it can easily understand its use case. For example, if you’re creating a calendar for a specific sale or promotion, call the calendar something like “Summer sale 2025.”
- Start Date and Expiration Date - Click the box to open a calendar where you can select dates to restrict when content is posted. The calendar duration prevents content from being posted outside the provided range. These fields are optional.
- Organic Content Approvals - Check the box here if you want content from your calendar to be approved automatically and added to your location(s) scheduler.
- Calendar Recipients - Use the search bar provided to find the locations and/or groups you’d like to share this calendar with.
- Click the Create button to start adding content to your calendar
Adding content to your calendar
Once your calendar is created, you can add content to it in two ways.
- Click a date on the calendar
- Drag pre-created library content over from the right sidebar menu
Add content by clicking the calendar dates
Within the Suggest Post window, you can:
- Select the connected social accounts you’d like to publish to — The social networks you have connected to this location will be listed here with a preview of your profile picture. A green check mark in the bottom right corner indicates the platform is selected for your post. Click each profile preview to select or deselect them. Not seeing a platform listed? Make sure it is connected to your location. Learn more about connecting your social profiles.
- Monitor message length — As you type your message in the Message box provided, Moz Local will keep track of your total character count on the top right. If your post exceeds the limits for a platform, this will be indicated with a red warning icon. Character limits for each platform are:
- Google Posts: 1,500
- Facebook: ~63,000
- Instagram: 2,200
- TikTok: 2,200
- LinkedIn: 3,000
- Enhance your message — You can add emojis or dynamic text to your message. Dynamic text allows you to add location details to your post, which is helpful when saving and creating post templates.
- Rewrite with AI — Click Rewrite with AI to get AI-assisted edits to your drafted message. Enter between 5 and 2000 characters to rewrite a message. The count beside the button indicates how many AI credits you have left for the month for this feature.
- Add media to your post — You have the option to add photos, GIFs, or videos to your post using the buttons below the Message box. You can also use the Shorten URL button to condense any links included. Be sure to refer to specific platform guidelines regarding image size. Need help? Here’s a handy guide from Sprout Social.
- Choose from Library — If you have uploaded images to your library in Moz Local, you can access them here and add them to your posts.
- Create with Canva — If you need to create an image from scratch, click Create with Canva to open Canva and get started. Please note: You will need to have a Canva account already and will be asked to login if you are not already.
- Tag your post — Add tags to your post to help organize them within Moz Local. Tags can help sort and filter your content library, images, and more. Please note: Tags entered into this field are internal only and will not be displayed in your public post.
- Schedule your post — To schedule a post for the future, check the box here and enter the date and time you’d like to post. If you’d prefer to post immediately, leave the box unchecked.
- Exact Time or window of time — Use the drop-down to the right of the time fields to designate whether you’d like your post to go live at the exact time entered or within a designated window. If you select a window (e.g. ± 40 minutes) the tool will select a random time within that timeframe to post. This can help scheduled posts look more natural as they populate in feeds.
- Peak Time — Your peak time comes directly from Facebook and is used to help you understand the most ideal times for you to post on your Facebook page. Click the Peak Time button to automatically adjust your selected time of day.
- Review what networks you’re posting to — Before clicking Suggest, double-check that you’re posting to the right platforms and formats using the Posting As section.
- Preview your post — Click the icons above the preview to see how your post will look on each platform.
Once you’re satisfied with your message, click Suggest at the bottom right corner.
Add content from your library
To add content to your content calendar from an existing Library, use the drop-down on the right-hand side to select a library and then drag and drop the chosen post to suggest it.
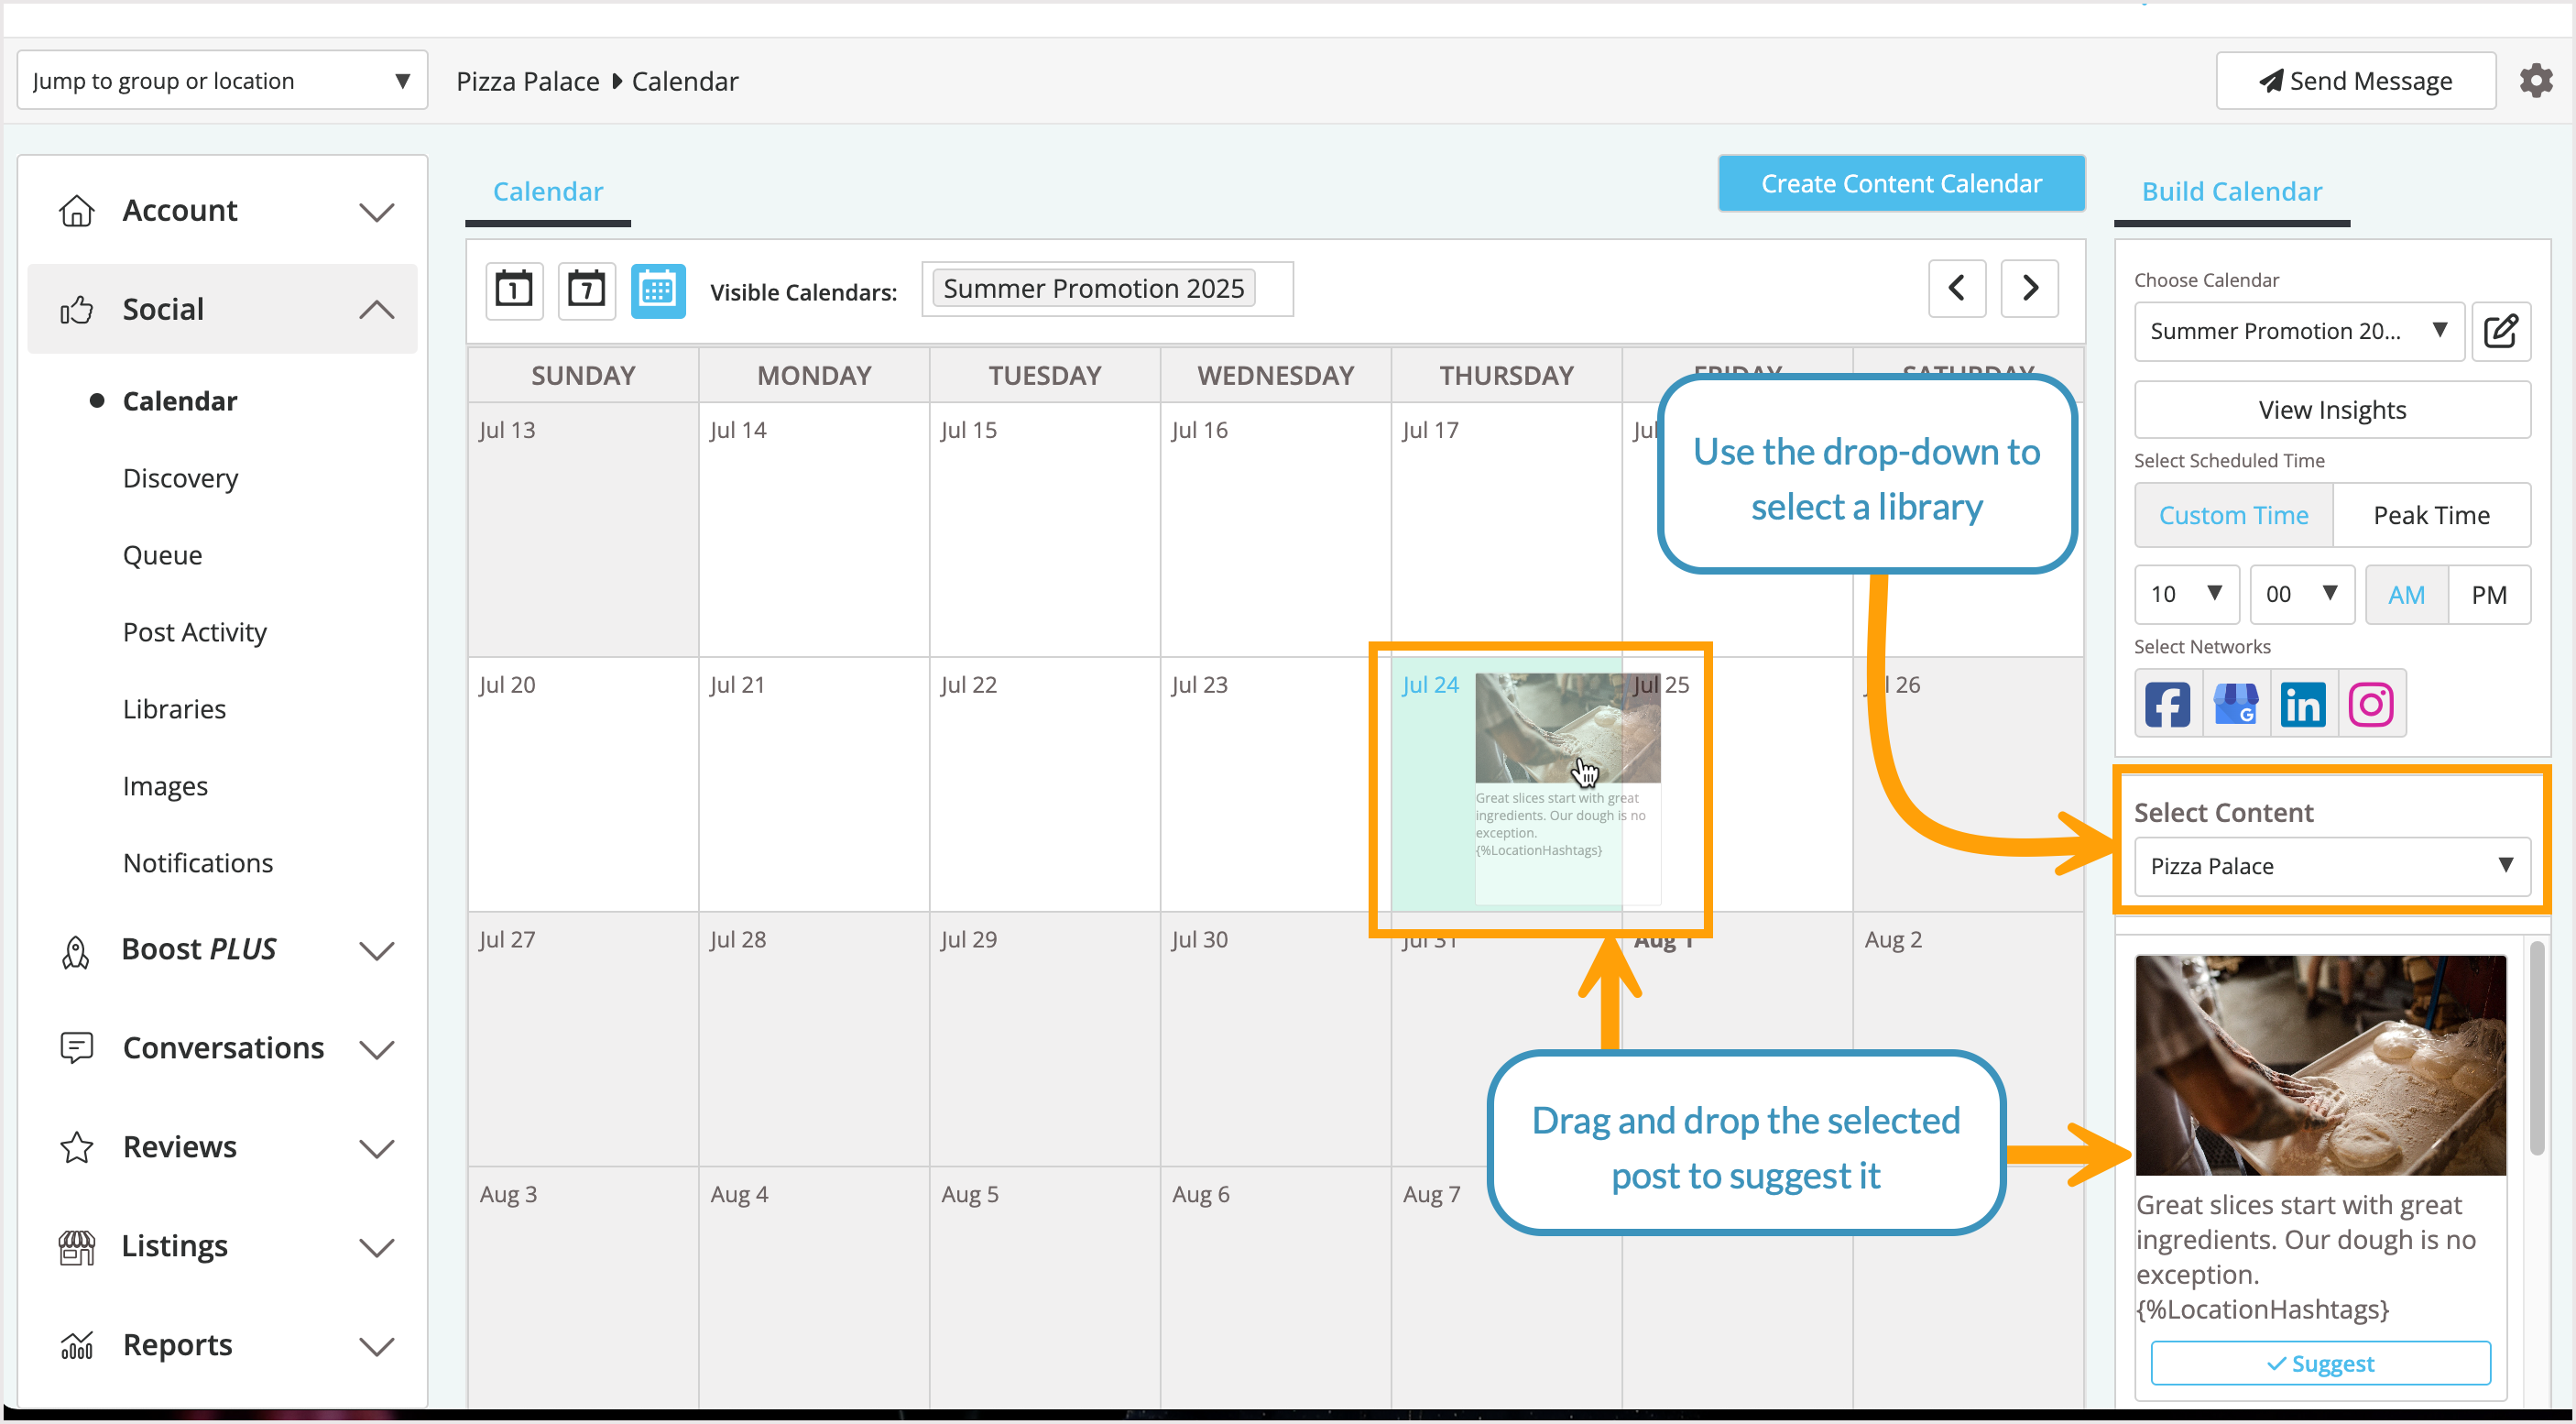
You can also Edit the library post if needed by clicking Edit in the right-hand menu.
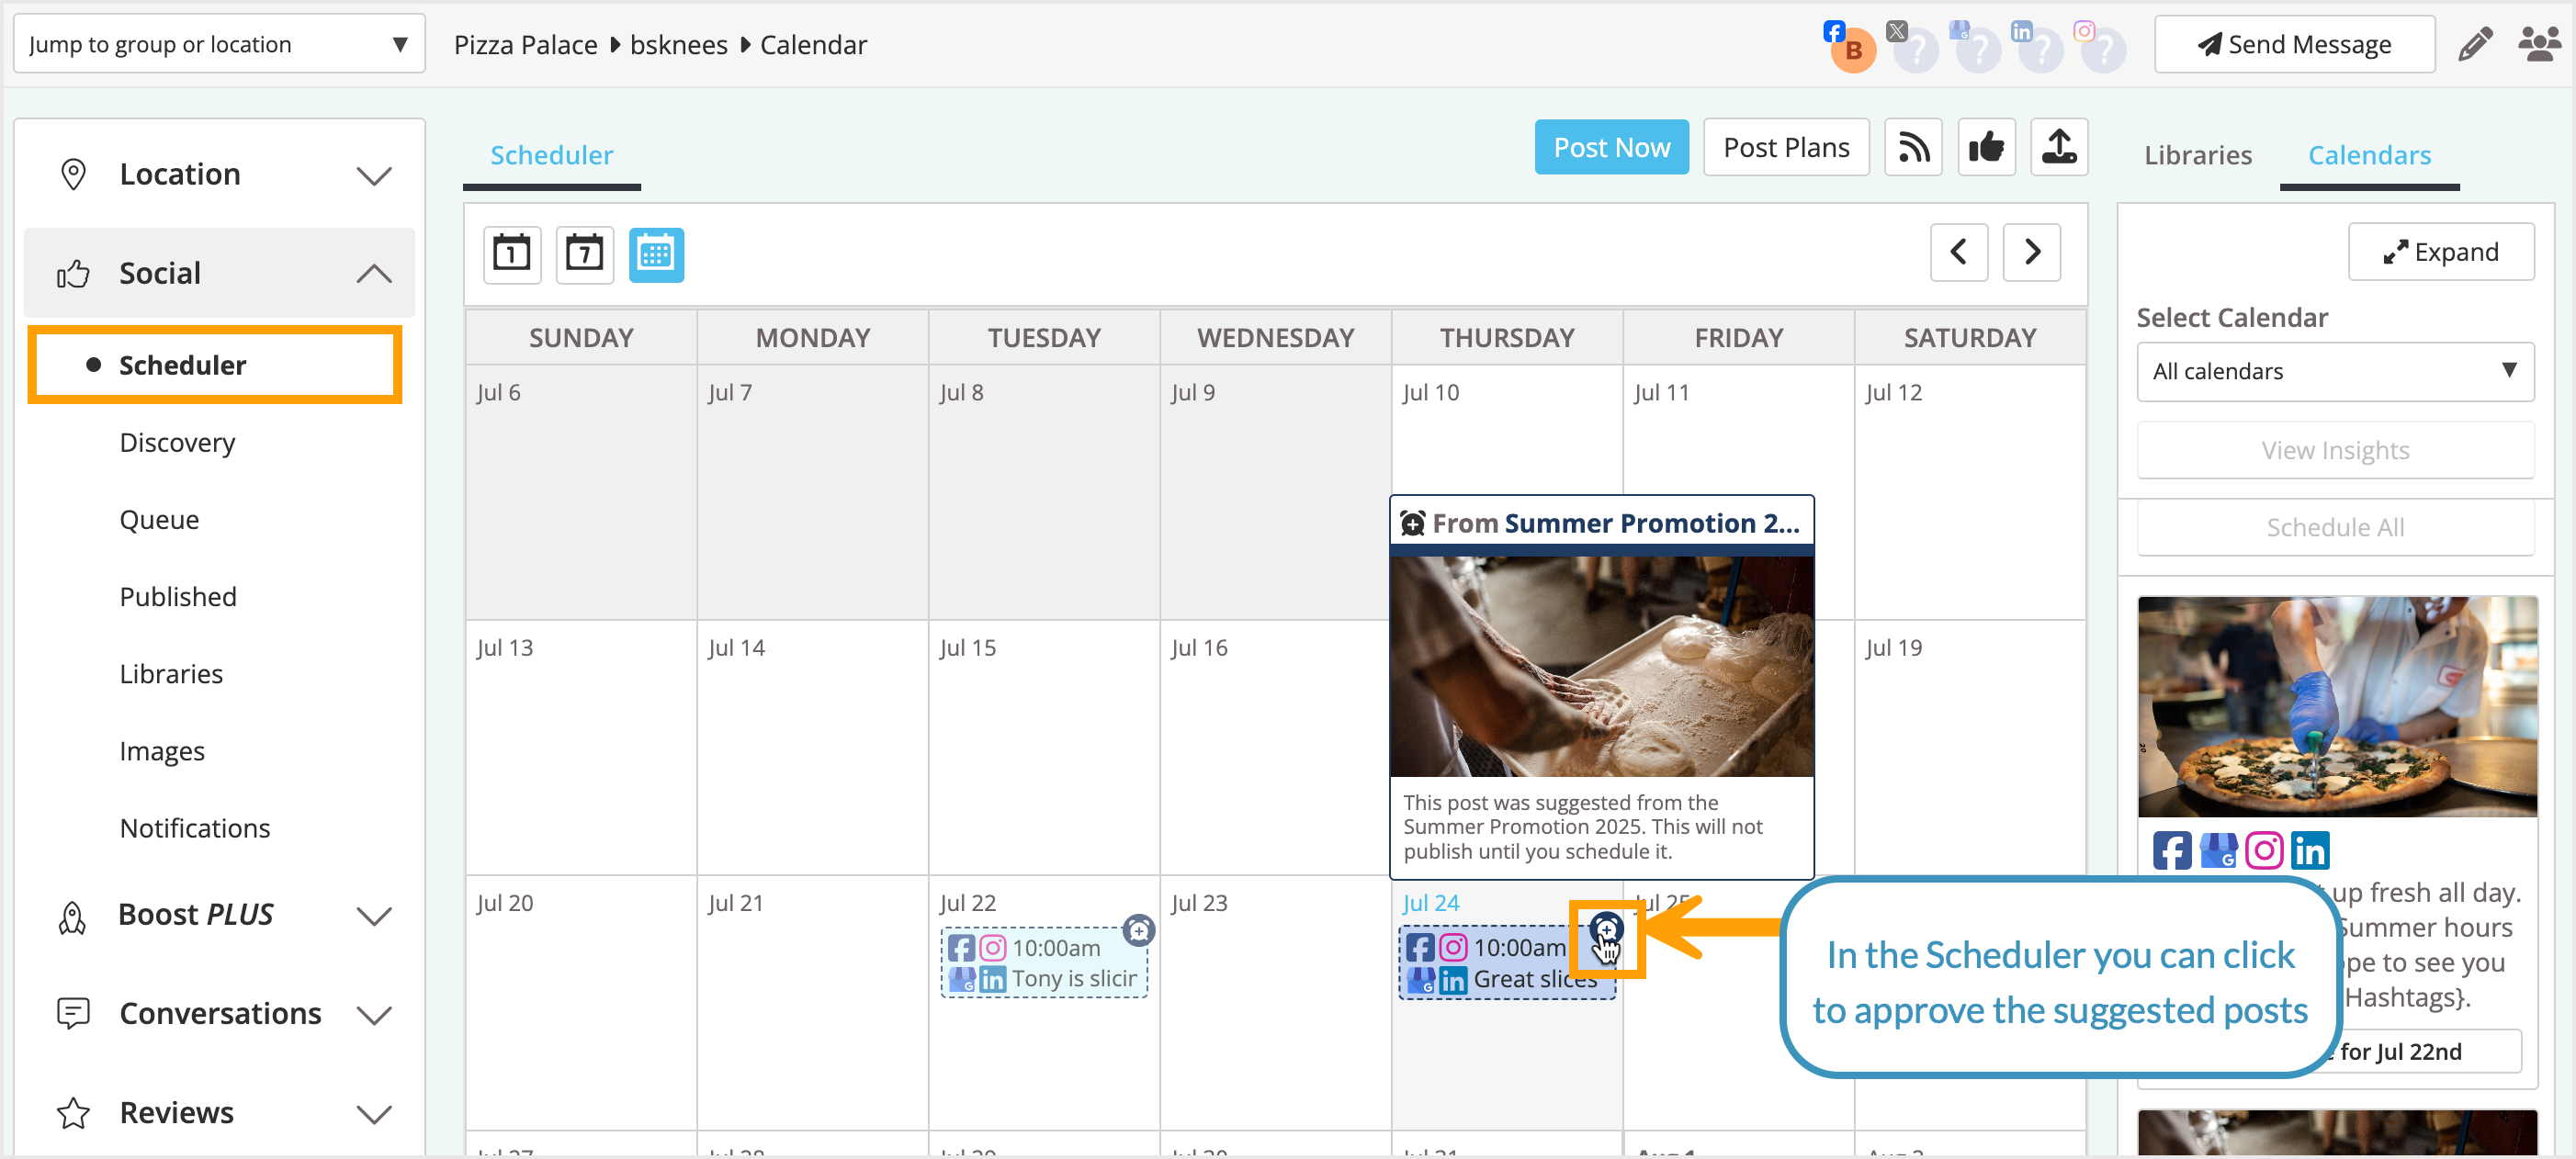
After suggesting posts for your locations, they will appear in the Scheduler view, where you can approve them to post. Click the Clock icon on the top right of the post to approve and add it to the scheduler.
Was this article helpful?
![]() Yes! Amazing!
Yes! Amazing!
![]() Yes! It was what I needed.
Yes! It was what I needed.
![]() Meh. It wasn’t really what I was looking for.
Meh. It wasn’t really what I was looking for.
![]() No, it wasn’t helpful at all.
No, it wasn’t helpful at all.
Thanks for the feedback.